
Data Collecting for Snowflake
How to use the Snowflake Data Warehouse destination in StreamSets Data Collector to replicate an OLTP database
StreamSets Data Collector offers incredible flexibility while creating data integration pipelines by allowing developers to either create a custom stage (an origin, processor, executor, or destination) completely from scratch, tailor a universal stage to a specific requirement, or use a dedicated stage for a particular technology, when available. In the past, the most straightforward method to load data in Snowflake Data Warehouse using Data Collector was to use some combination of JDBC and AWS or Azure stages, depending on specific requirements.
As of January 16, 2019, StreamSets Data Collector (SDC) Version 3.7.0 and greater now includes a Snowflake Data Warehouse destination, an optimized and fully supported stage to load data into Snowflake. The addition of a dedicated Snowflake destination simplifies configuration which expedites development and opens the door for getting the most out of your SDC+Snowflake integration.
Snowflake Destination
StreamSets officially announced general availability of the new Snowflake destination through a press release that can be found on the StreamSets website. Further, instructions on how to set up and use the new destination are included in the SDC Documentation.
The new SDC Snowflake destination includes all of the expected settings required to connect to Snowflake. Configurable items such as region, account, database, schema, warehouse, stage, etc. should all be familiar to Snowflake users.
Looking beyond the basics, a few of the notable items to call out right away include the ability to automatically create Snowflake tables that do not yet exist, the ability to detect and accommodate data drift, and the option to use Snowpipe for loading data asynchronously.
Data Replication
A common use case for loading Snowflake is to replicate data from an OLTP database so that it can be used for reporting and analytics. With Oracle databases being one of the most common on the market, replicating an Oracle database in Snowflake is a great candidate to get our hands dirty with the new Snowflake destination. What follows is an explanation of how to use StreamSets Data Collector to replicate data from an Oracle database into Snowflake Data Warehouse.
Prerequisites
A few pre-requisites are required to get started:
- A Snowflake account
- An Oracle database
- Satisfying the Data Collector pre-requisites for JDBC Multitable Consumer, Oracle CDC, and Snowflake as listed in the SDC documentation.
The Historical Load
There are almost always two parts to data replication: gathering what exists in the database today (historical load) and replicating transactions as records are created, updated, or deleted in the database going forward (change data capture). The historical load can be completed in a variety of ways; for this exercise, the JDBC Multitable Consumer is a good option.
Create a New Pipeline
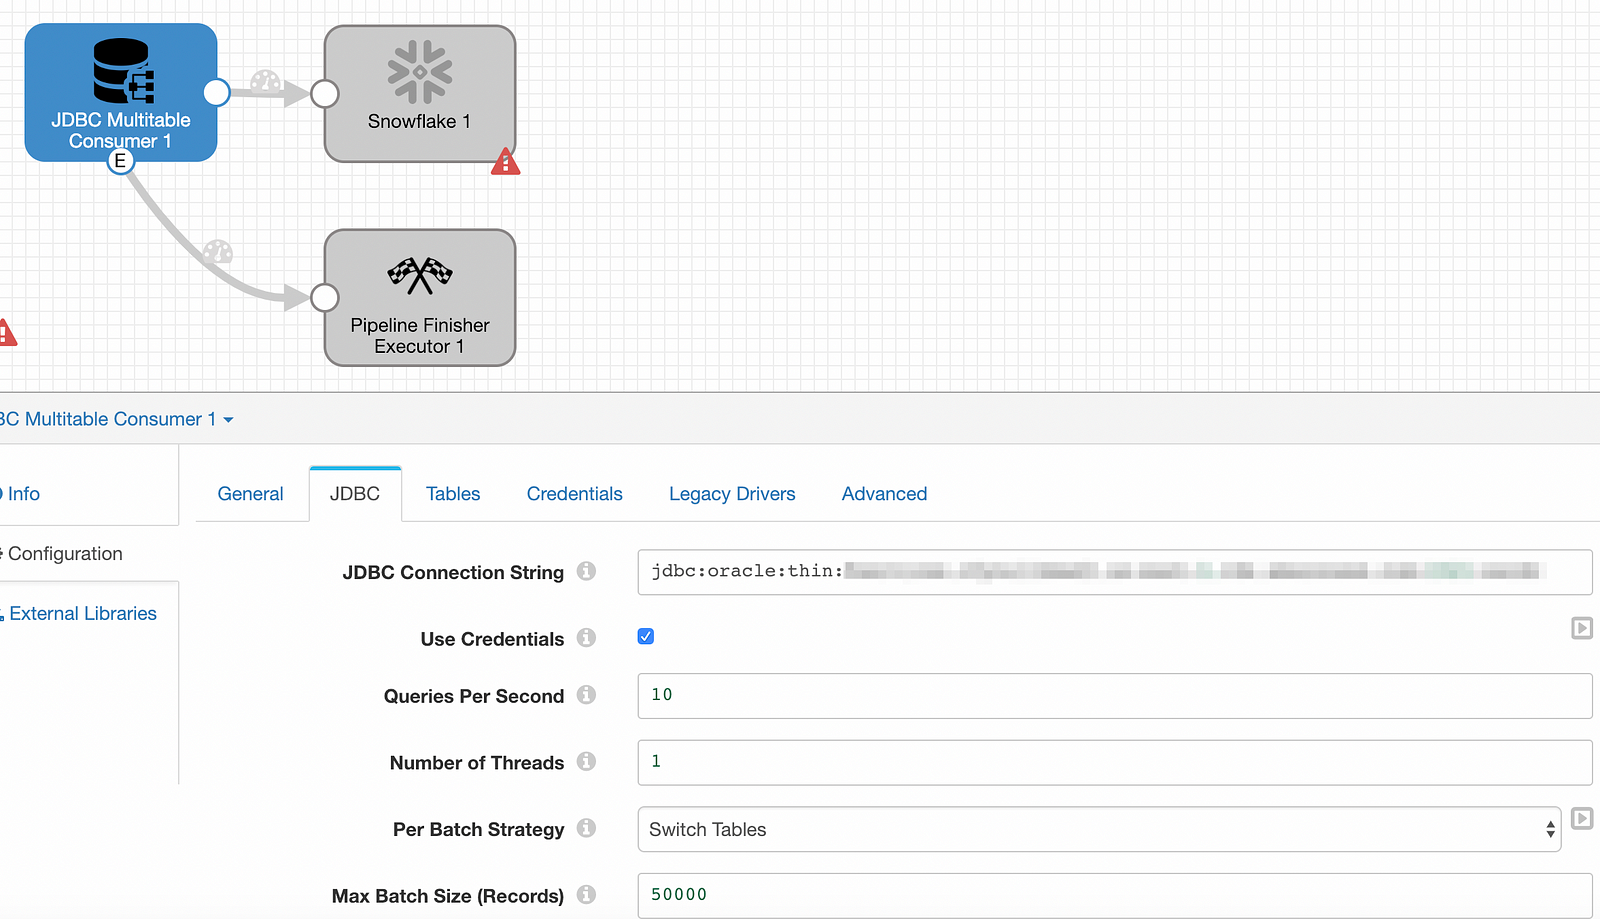
First, create a pipeline with a JDBC Multitable Consumer origin and a Snowflake destination. We’ll also add a Pipeline Finisher executor so that the pipeline will stop after it loads all of the available data. After all stages are added and connected, the pipeline should look like this (don’t sweat the validation issues, they will be cleared up shortly):

Configure: JDBC Multitable Consumer Origin
Within the JDBC Multitable Consumer stage under JDBC, update the Oracle database connection string and change the Max Batch Size (Records) parameter to 50000. Note: Make sure the production.maxBatchSize parameter has been set to 50000 or greater in the $SDC_CONF/sdc.properties file. There are other parameters that may be candidates to tweak but we’ll stick with the basics for now. Also be sure to enter the appropriate database credentials.
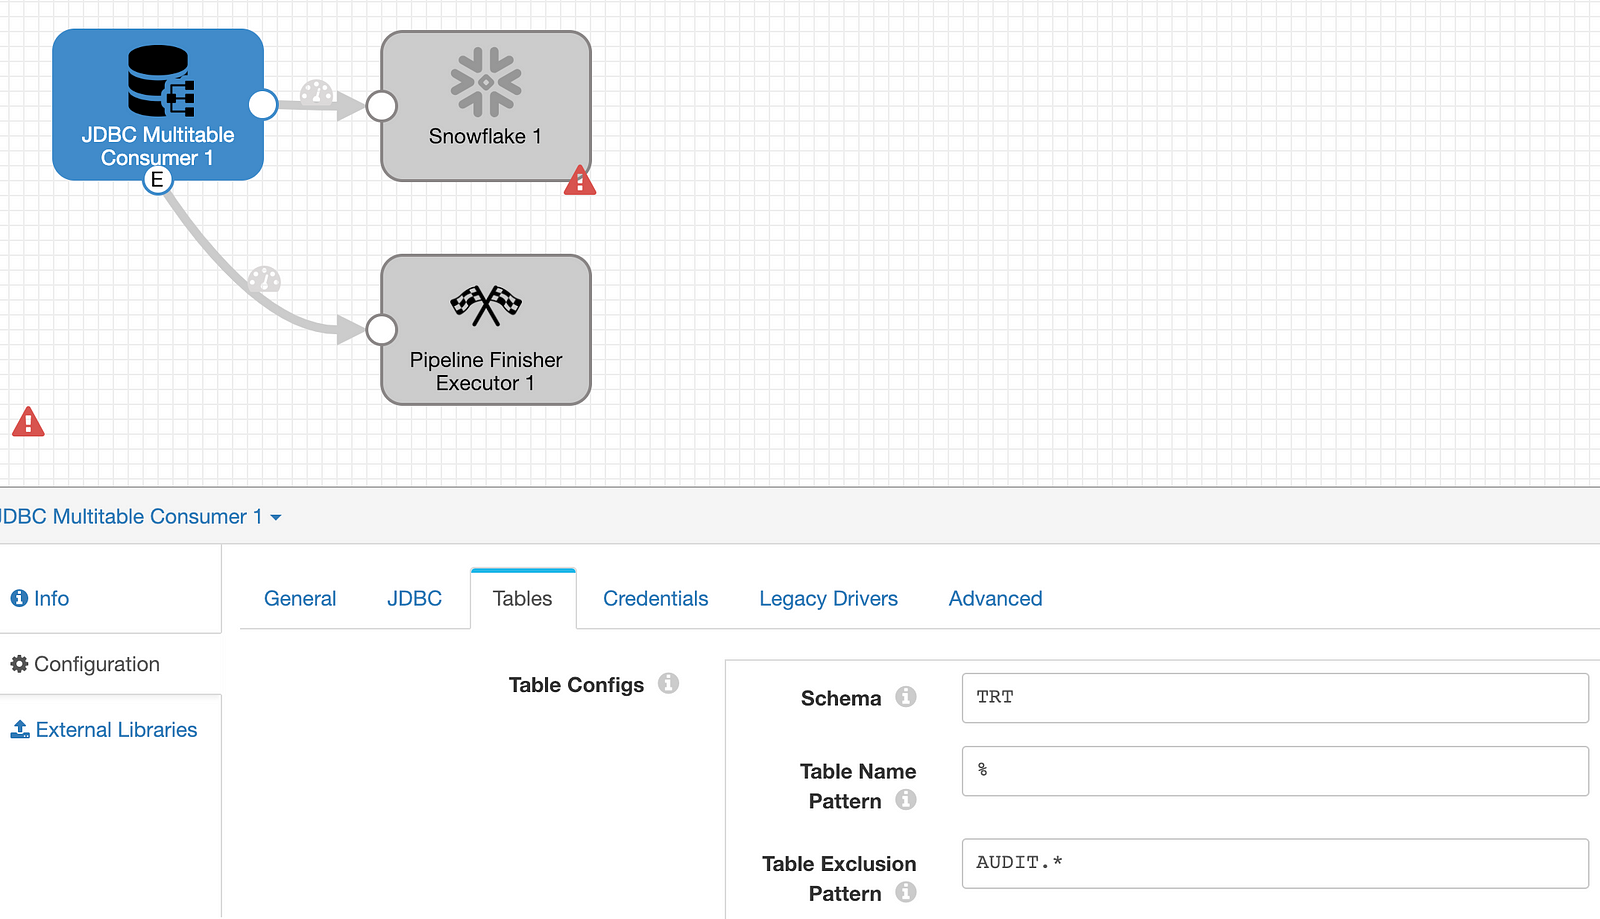
On the Tables tab, configure the origin to include tables that are of interest. In this case, I have a schema called ‘TRT’ that contains a handful of tables with financial brokerage data. There are a few audit tables that don’t provide any value so I’ve decided to exclude those from being replicated by using the java regex AUDIT.* in the table exclusion pattern. By using a % wildcard as the table name pattern, everything else comes along for the ride.
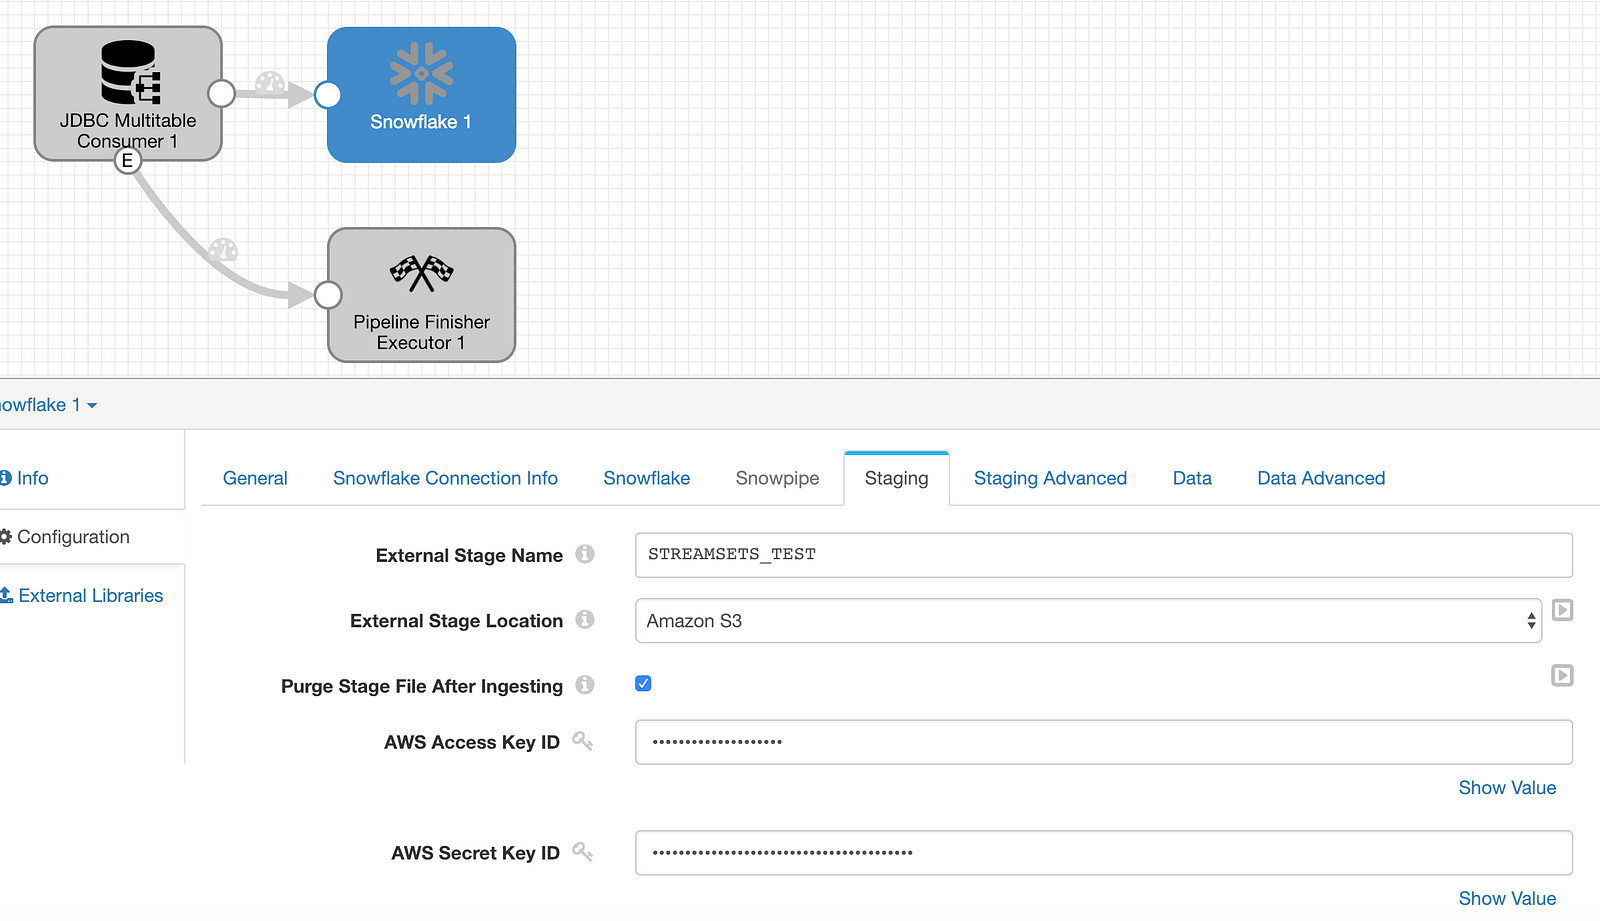
Configure: Snowflake Destination
Moving on to the Snowflake configuration: set the region, account, and enter the user id and password on the Snowflake Connection Info tab. On the Snowflake tab, set the warehouse, database, and schema to the relevant values and then enter ${record:attribute('jdbc.tables')} in the Table field to instruct SDC to use the name of the table that exists in the source database. Check the boxes for Upper Case Schema & Field Names, Data Drift Enabled, and Table Auto Create.
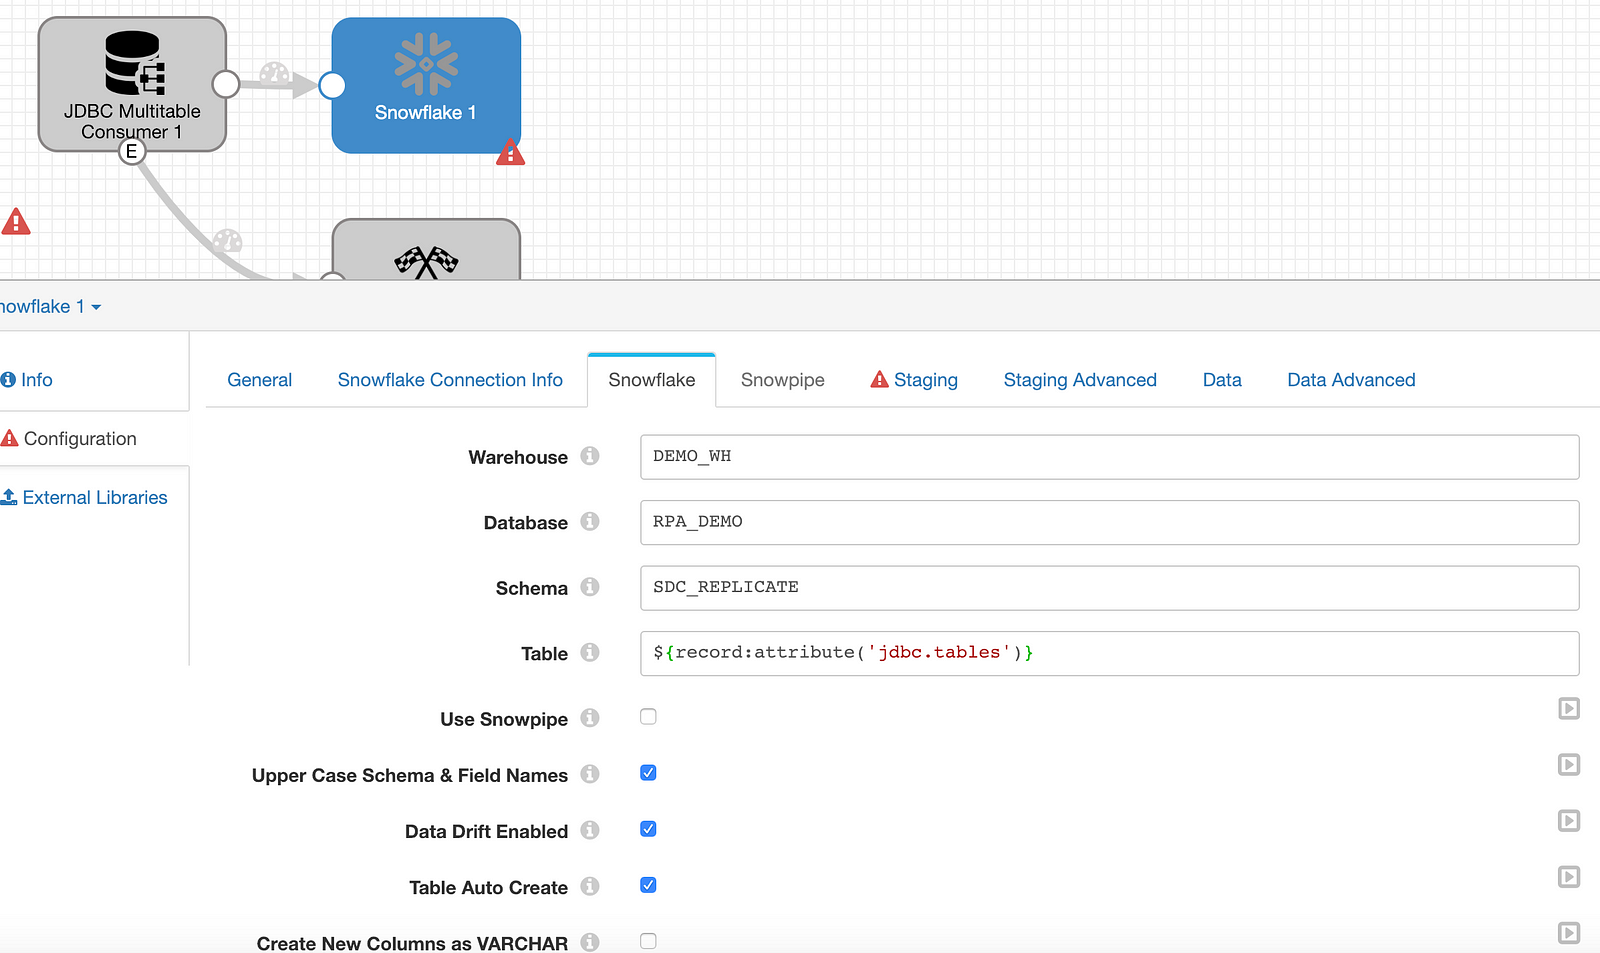
Under Staging, enter the name of the external stage for SDC to use as a staging location and provide an AWS key pair. I have also chosen to purge the files after ingestion to keep from unnecessarily filling up the S3 bucket.
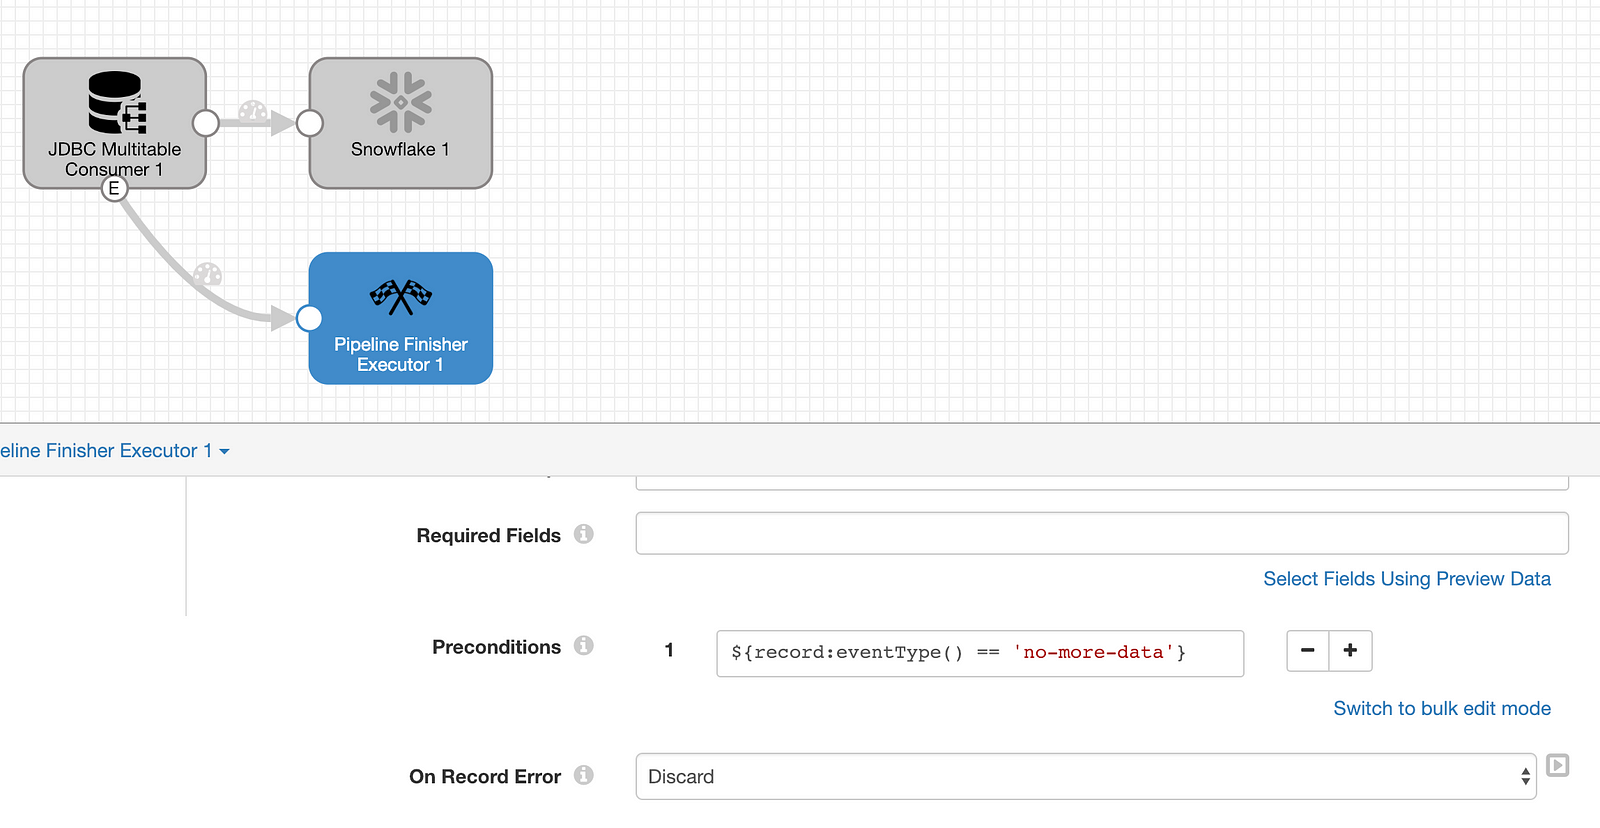
Configure: Pipeline Finisher
Set a precondition on the Pipeline Finisher executor to only be executed after all data has been loaded by entering ${record:eventType()=='no-more-data'} .
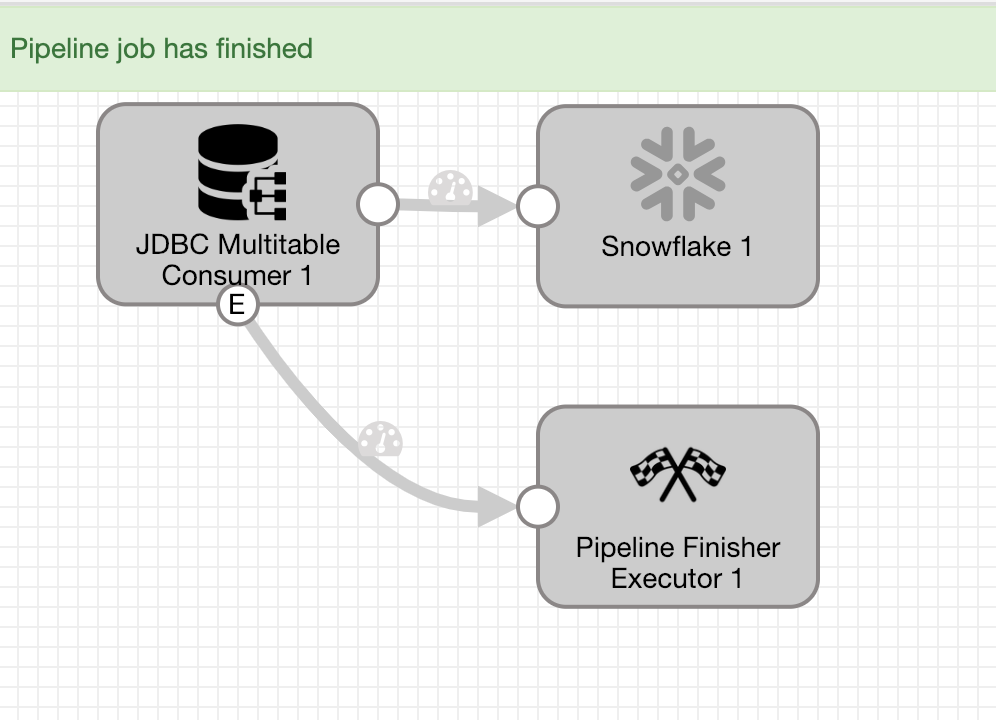
The SDC pipeline for the historical load of data in the source Oracle database is now ready to go. After validating to be sure, click Run to start processing. Keep in mind that no target tables have been created in Snowflake up front.

After loading all data that exists in the source database, the Pipeline Finisher is called to stop the pipeline.
Review Snowflake
Now that the pipeline has finished, a review of Snowflake shows that all of the tables have been created and loaded with data.
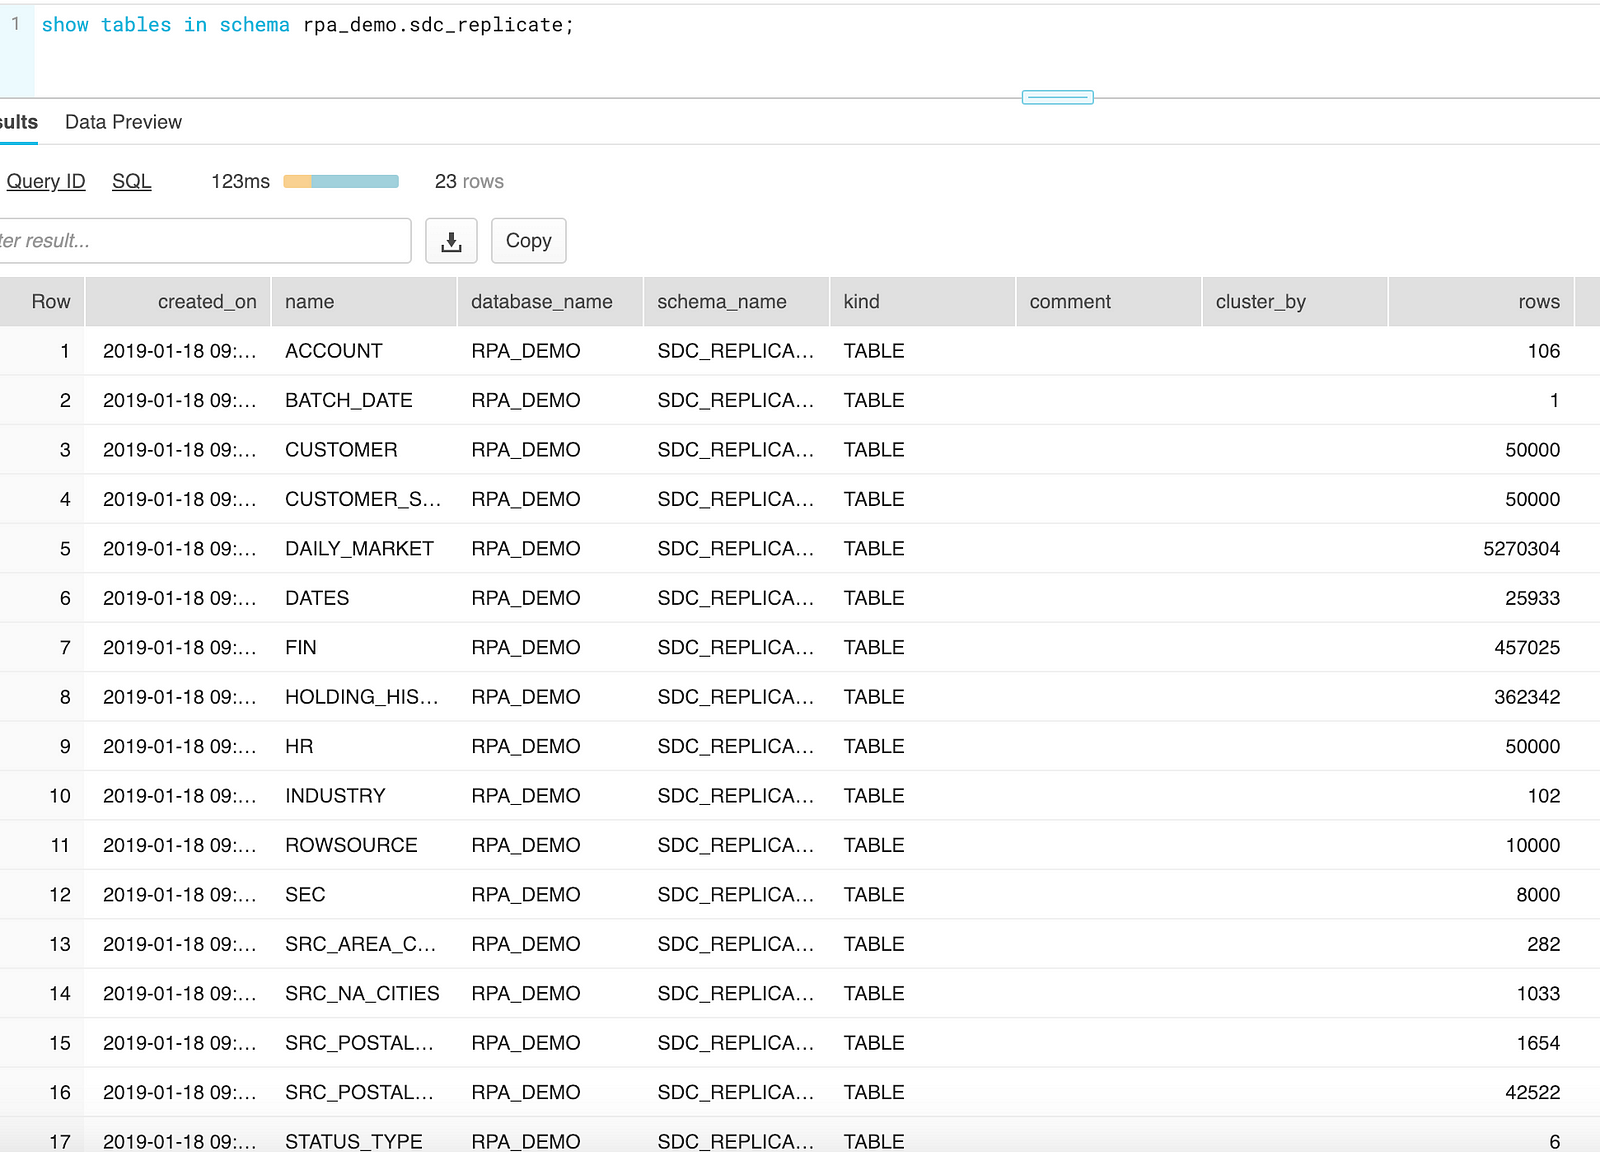
At this point, it makes sense to run through a series of validation steps; for example, check that all tables have been created correctly, the row counts match, compare sample records, so on and so forth. After everything checks out, it’s time to move on to CDC.
Change Data Capture
Once all of the existing data has been loaded, the next step is to set up SDC to replicate changes in the source database as transactions occur. Change data capture (CDC) is typically performed by reading the database change logs and StreamSets is no different. There are several mechanisms that can be used to ensure no gaps in processing; however, the source Oracle database is in a controlled environment so none of that will be necessary for this exercise.
Create CDC Pipeline
Create a new pipeline with an Oracle CDC Client origin and a Snowflake destination.
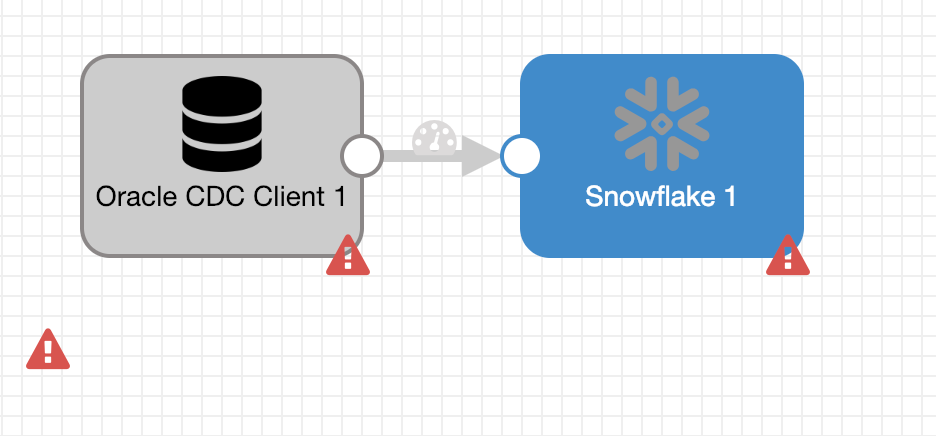
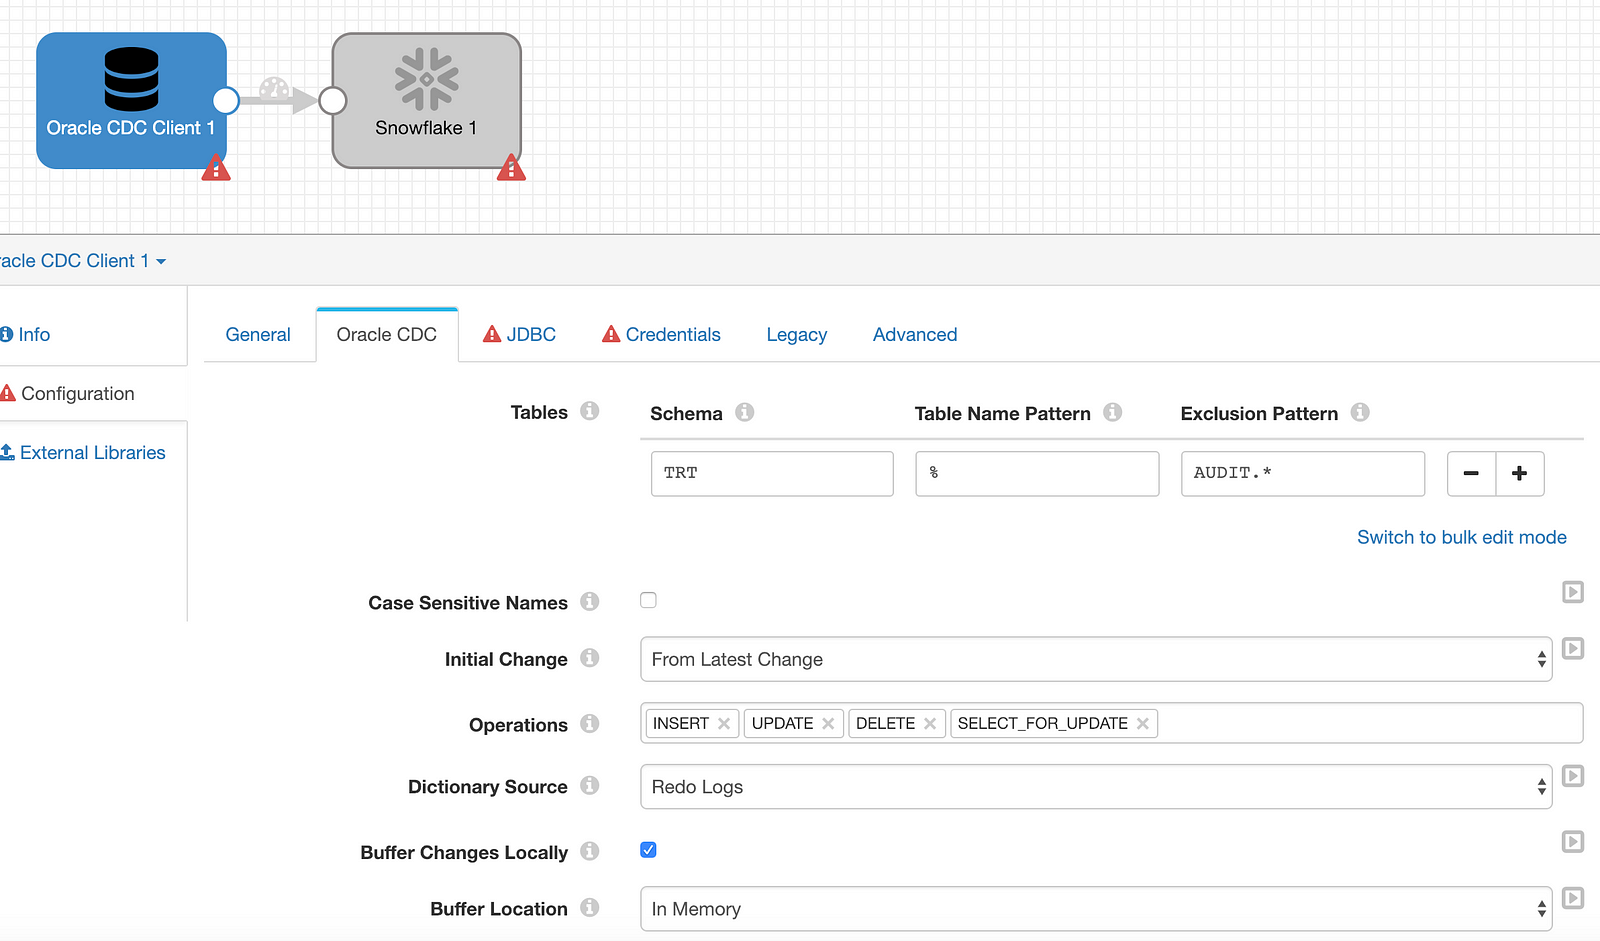
Configure: Oracle CDC Client
The Oracle CDC client now needs to be configured to connect to the same Oracle database that has been loaded with historical data. On the Oracle CDC tab, use the same schema and table matching/exclusion criteria as the historical load. In this case, TRT, %, and AUDIT.*, respectively. Also set the appropriate options based on the specific setup (dictionary source, db timezone, etc.)
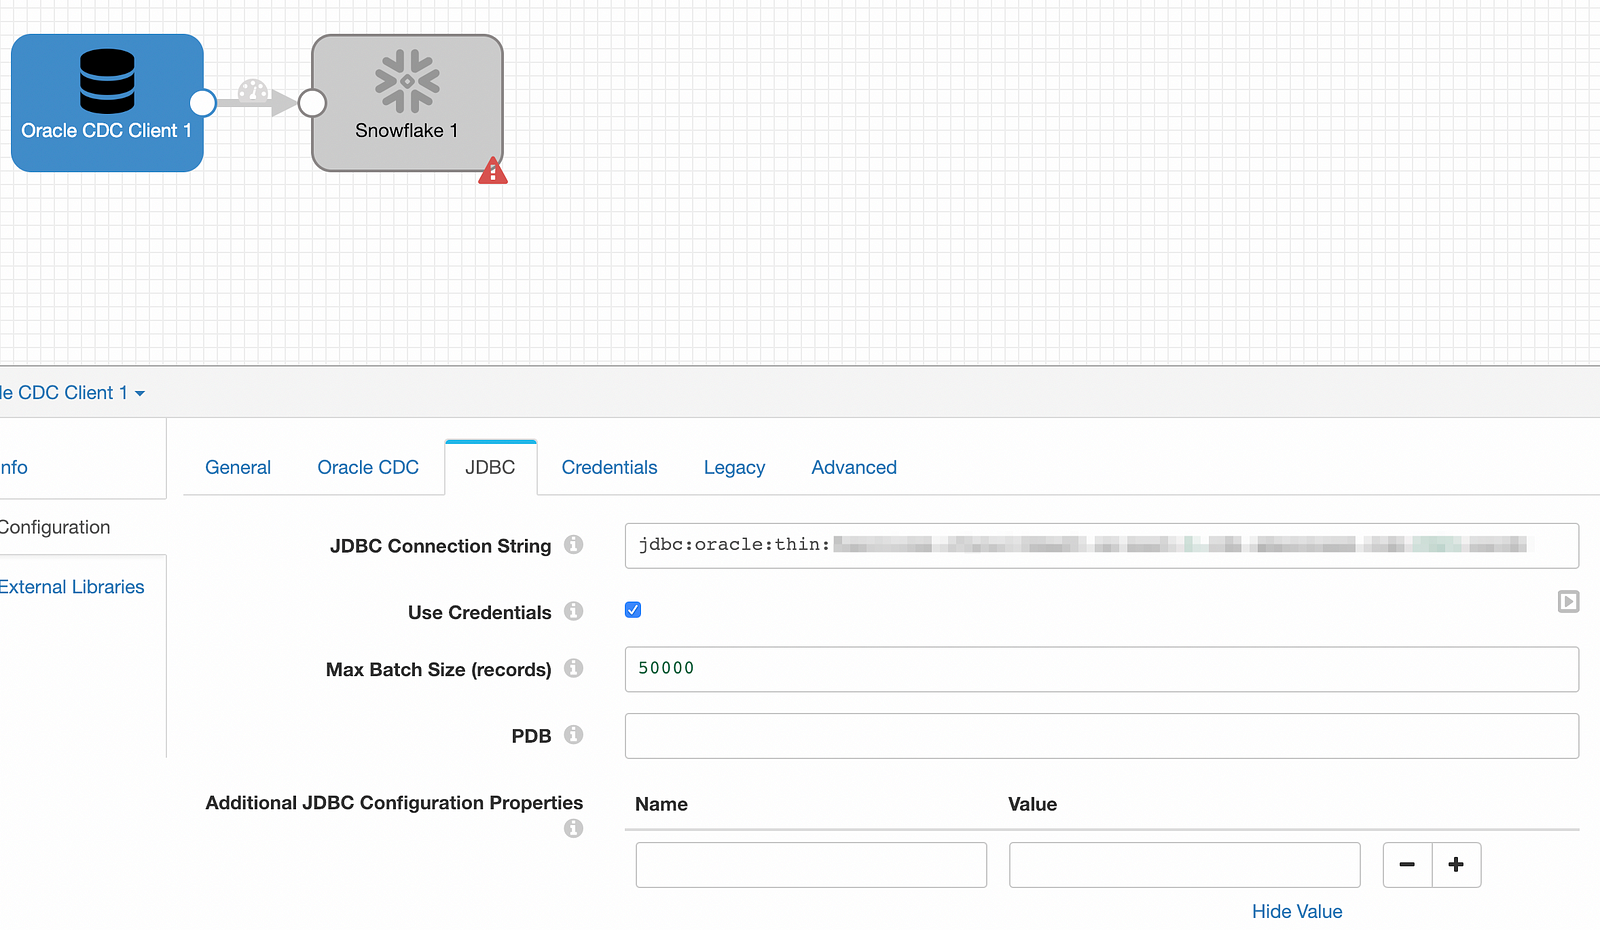
Enter the connection string the JDBC tab, set the Max Batch Size (records) to 50000, and provide the user id and password under Credentials.
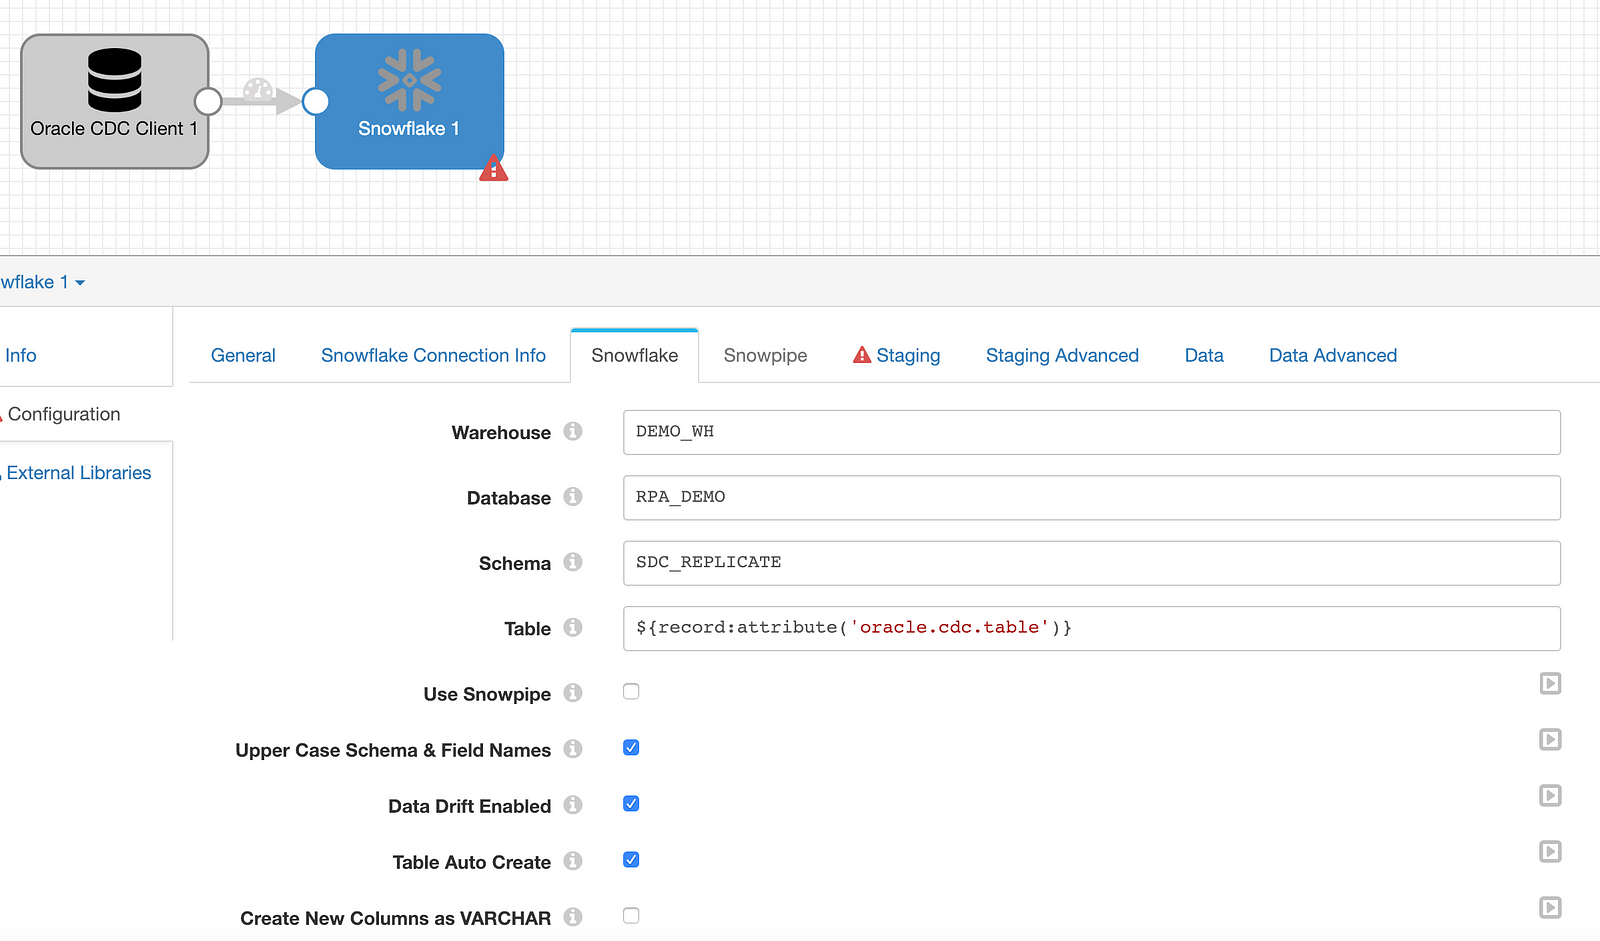
Configure: Snowflake
The Snowflake destination needs to be configured exactly as it was for the historical load with a few exceptions:
Enter ${record:attribute('oracle.cdc.table)} in the Table name under Snowflake to allow SDC to detect the table name automatically and ensure that Table Auto Create and Data Drift Enabled are checked.
Complete the configurations for Staging and then move to the Data tab. Check the box to enable CDC and enter the key columns for all tables. If there are several tables, bulk edit mode may come in handy. Enabling CDC will instruct SDC to generate SQL merge statements to handle the CRUD commands as the Oracle database logs are processed by StreamSets and written to Snowflake.

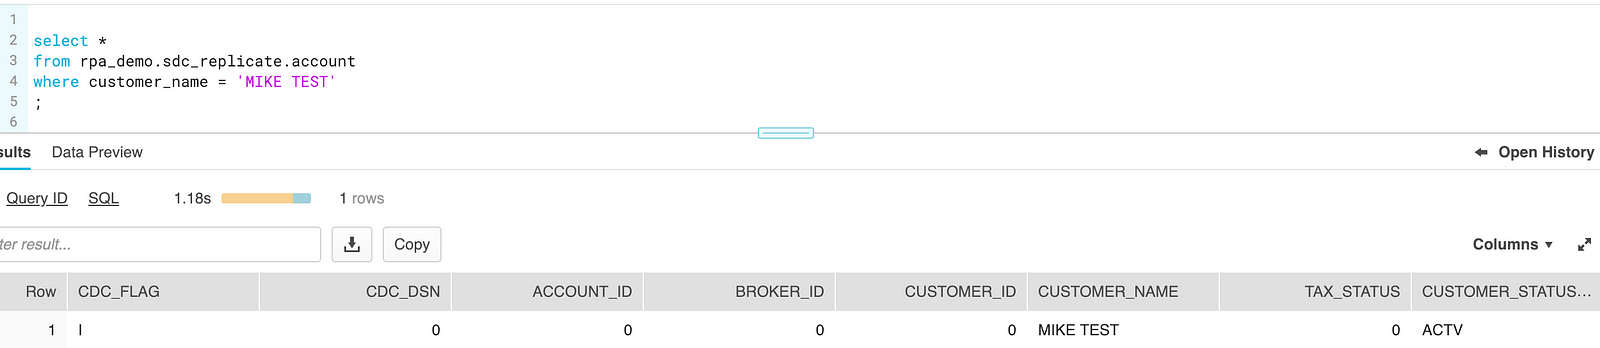
That’s it. Fire up the CDC pipeline and start making some changes in the source database. Inserting a new record is the obvious first test:
insert into trt.account values ('I',0,0,0,0,'MIKE TEST',0,'ACTV’);

1 row inserted.
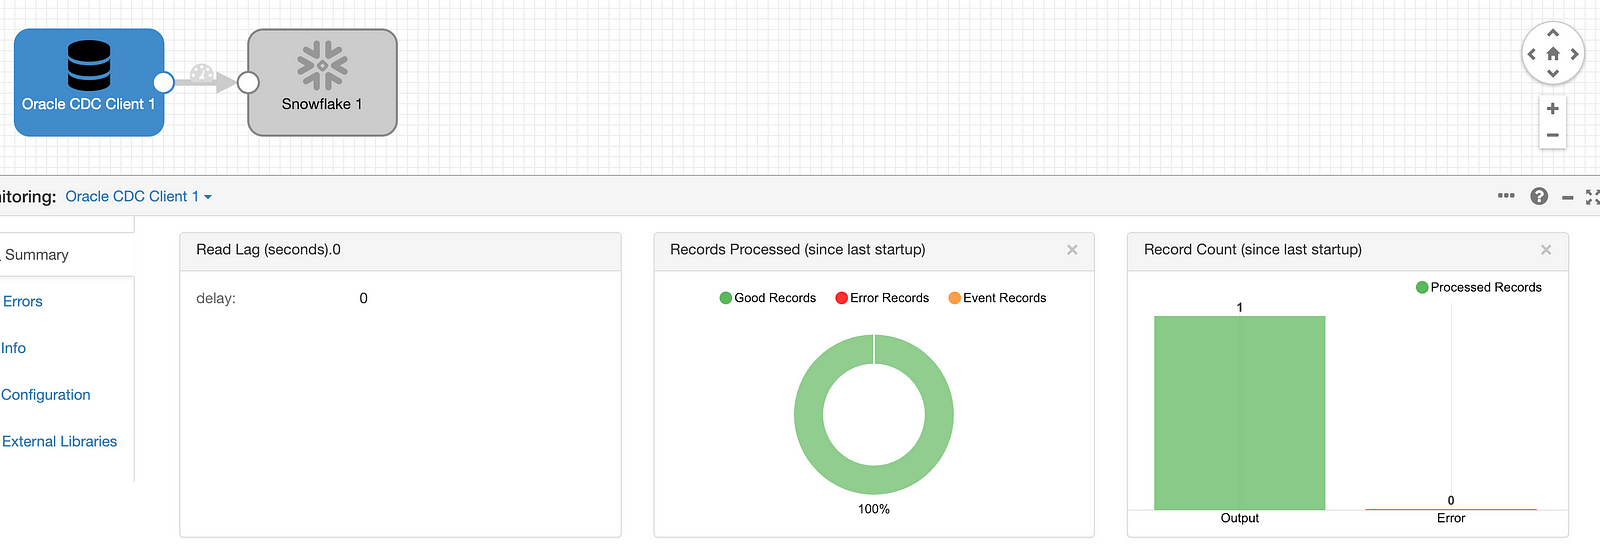
SDC shows the record was processed:
And Snowflake returns our test record:
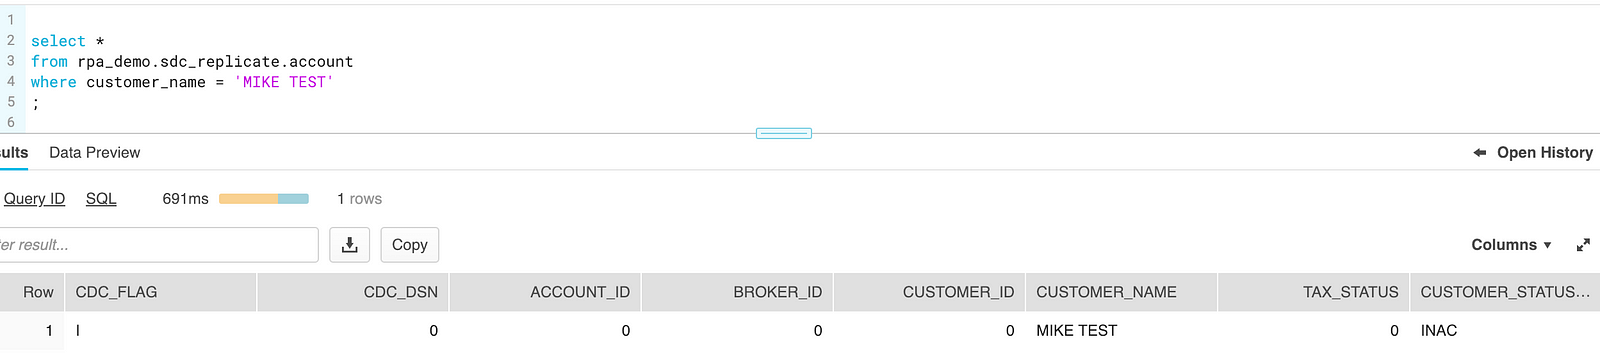
Now for an update:
update trt.account set customer_status_type = 'INAC' where customer_name = 'MIKE TEST';

1 row updated.
Snowflake received the update and reflects the change:
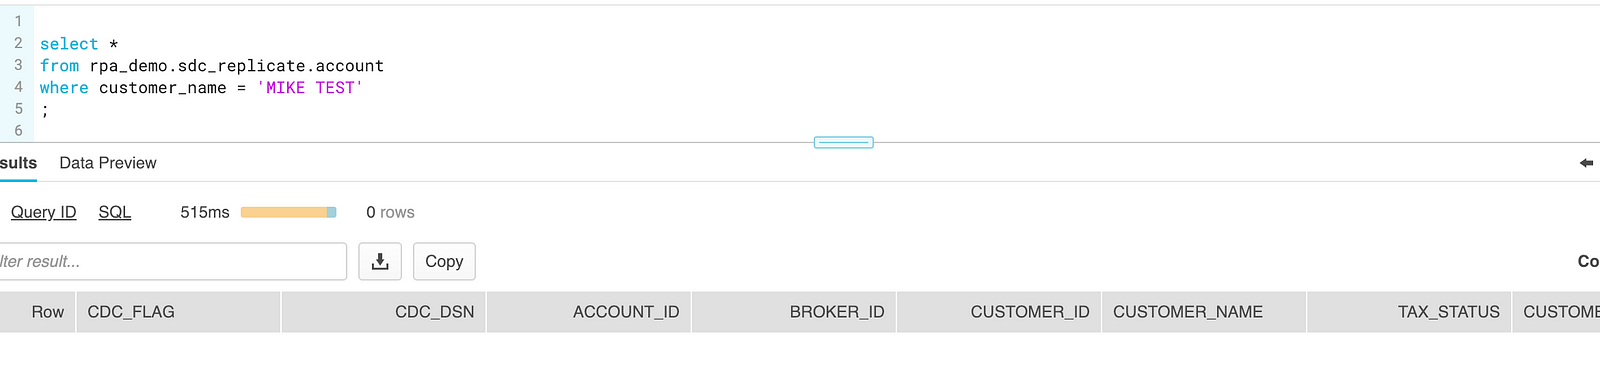
delete from trt.account where customer_name = 'MIKE TEST';

1 row deleted.
The row is also deleted from Snowflake:
As the evidence shows, SDC is mining the Oracle database logs, processing the transactions, and replicating changes in Snowflake in real time.
DevOps and Snowflake
By partnering with Snowflake, StreamSets brings DevOps data integration to the premier data warehouse built for the cloud. Combining StreamSets Data Collector with Snowflake Data Warehouse has always been a leading choice for Red Pill Analytics and we’re looking forward to being able to advise our customers that StreamSets can now be integrated with Snowflake in an officially supported capacity.
Need Help?
Red Pill Analytics is a Snowflake Solutions Partner as well as a StreamSets Partner. From proof-of-concept to implementation to training your users, we can help. If you are interested in guidance while working with Snowflake, StreamSets, or any of your data or analytics projects, feel free to reach out to us any time on our website or find us on Twitter, Facebook, and LinkedIn.
One Response to Data Collecting for Snowflake