
The Problem
Not long ago, Stewart approached me to help him prepare an Amazon Web Services (AWS) environment that he could use for an ODTUG KScope hands-on lab. He sent me the original virtual machine and I got working on importing it into one of our S3 buckets. Usually, this is a pretty easy process (and well documented — thanks internet!), but what if you have a virtual machine that has more than one partition like I did? That’s when things start to get interesting…
Some of you may be wondering “What does Phil mean by a partitioned VM?”. That is a great question, and I’m so glad (some of) you asked that. By “partitioned”, I mean a virtual machine that has multiple virtual disks. You can either check within your VM if there are multiple disks, or when it exports from a VM client into .VMDK format, it will split into multiple .VMDK files.
Usually we can use the ec2-import-instance command found within the ec2 command tools to upload a VM into AWS. However, this doesn’t work very well because we need the two pieces to function together, not as separate entities. If we do load them using ec2-import-instance and then launch a new instance using these two drives, we will get an error because the OS has been split across both drives (at least that is how mine split). After trying to merge the files into one .VMDK, and many other failed ideas, I came up with something that works.
Below is how I went about finding a solution and the how-to guide so you can do it yourself.
The Solution
What I ended up doing was using the ec2-import-volume command and imported my .VMDK files as volumes. Once that was done, I created a new instance based on a Red Hat Enterprise Linux and then attached my two volumes to it and booted it up. Finally, I created a directory identical to the one in my non-cloud VM and unpacked the two volumes into that directory. This allowed me to have the exact same functionality of my previous VM without losing or having to re-direct any directory references (which is extremely helpful when you have things like Oracle_Home in play).
The How-To Guide
A few items of note that you will need to get started:
- A multi-parititioned VM that is prepped for the cloud. If your VM is cloud ready, excellent. If it isn’t, I recommend using the AWS guide for how to prepare your VM.
- Java installed on the machine you will use to upload the .VMDKs. You can download the latest version here, if you do not have it.
- An AWS account, along with your AWS public and secret keys. Talk to your AWS Admin if you have questions about these.
- The EC2 Command Line Tools. You can download those here. Follow the GUI to install them once they are downloaded, and complete the set up as described by AWS here.
When uploading VMs into AWS, the file must be in a specific file format (either RAW, VDI or VMDK). To get the file format you need, you can export the VM from a VM utility.
Uploading the .VMDK Volumes
- Open a terminal window and navigate to the directory in which your .VMDKs were saved after the export.
- Use the ec2-import-volume command to begin importing your first .VMDK file.
- The command structure is as follows:
- ec2-import-volume: This is the command name. Follow it with the name of the file that you wish to upload.
- -f file format: Specify the format of the file
- -z availability zone: This is the region in which the volume will be available
- -b bucket: Specify the S3 Bucket that the volume will be copied to.
- – w secret key: Your AWS Secret Key. I like to place mine in a variable, which you may have done as well.
Final command output should look something like this:
ec2-import-volume IMDB_HOL_disk1.vmdk -f VMDK -z useast-1a -b rpa.imdb -w $AWS_SECRET_KEY
Do the above command for as many disks as you have. Once they have completed uploading, you should be able to log into AWS EC2 and view the volume in the “Volumes” section. Once there, create a snapshot of your Volumes by right clicking on your volume and selecting “Create Snapshot”. Then copy the Snapshot ID into a Notepad or Text/Edit program; we’ll be using this later.
Creating a New Instance Based on the New Volumes
Now that we have our volumes in AWS, let’s put them to work.
- Create a new instance by navigating to the EC2 Dashboard and clicking on the “Launch Instance” button.
2. This will open a 7 Step process to create a new instance. Choose an OS is compatible with your volumes (Red Hat Enterprise Linux in my case), and also choose the the size that is appropriate for your VM. Also review the networking settings. (Steps 1–3).
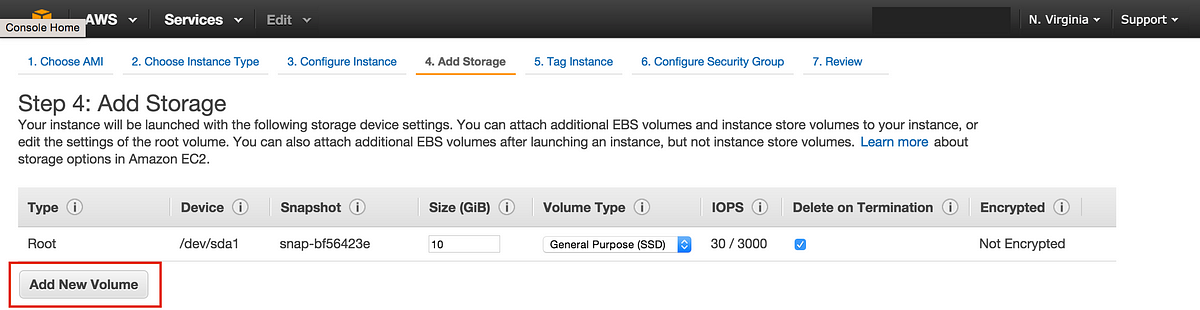
3. Step 4 of this process is where you add your Volumes to the new instance. Click the “Add New Volume” button.
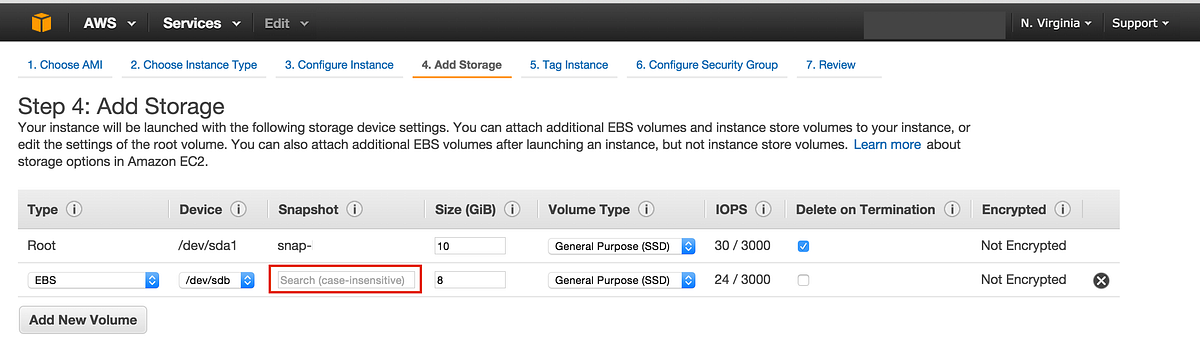
4. You’ll see that a new row has been added. Paste one of the Snapshot IDs into the “Snapshot” text field. Adjust the size of the memory so that your Volume fits. Repeat this step as many times as necessary so that all of your volumes are represented on the “Add Storage” Step.
5. Continue creating the instance and launch it.
Configuring the Instance
Once your instance has launched, connect to it via Terminal (you will need to have configured your AWS security group to allow inbound SSH traffic from your IP). Your SSH command should look something like this:
ssh i ~/.ssh/IMDB.pem ec2user@$AWS_MACHINE_IP
The .pem file seen in the ssh command is the file you need to access the machine. You should have downloaded one when you created the instance (or you can reuse one from another instance). Remember, you cannot re-download these files, so if you accidentally lose it, you have to recreate the instance with a new security group!
You may be looking around in your instance wondering where the drives have installed, and how you can merge them. We’ll need to mount both of the drives in a common directory. I highly recommend using or creating a directory to match what the OS was on the non-AWS VM client. I used the /home directory.
- Execute the following command:cat /etc/fstab
- Then navigate to the following directory: cd /opt/dev
- Execute the following command on all of your volumes: sudo mount $EBS_VOLUME_X /$DESIRED_HOME
- Once the mount commands are finished, your volumes will be consolidated and your instance will have the same directory and products as it did prior to the export!
Final Thoughts
If you are planning on using a GUI for your AWS instance, you may need to configure that as well. As for me (and Stewart), we only needed to be able to get our databases into the cloud, so our work here is done.