Working as an IT Professional I need to adhere to standards; working in consulting these standards may vary between customer organizations. Some places are Agile shops, some are classic waterfall, others use whatever flavor of methodology that suits them best. Two things are a given though: We use source control to protect and version the code assets we have spent a major part of our project time creating and we use some form of deployment methodology that ensures we can roll out software releases in a controlled way and if need be revert to a previous stable version.
Historically interfacing GUI based data integration tools to industry standard version control software (VCS) has been less than easy. For example to store ODI mappings in GIT I would need to write some scripting to export the design as an XML file to a file system containing my GIT branch then execute some git commands to commit my change and possibly push it to the remote GIT repository. True, ODI had a create Version feature, however I never really loved it. This version is basically a ‘labeled’ copy of Design Repository objects held in the Master Repository. Two aspects of this feature were less than endearing.
- The versions are only held in the ODI repository database, code security is through database backups and not whatever corporate standard VCS is in use.
- There are no scripting APIs to automate this versioning process — it is all point and click, and that is often unacceptable in an enterprise IT situation.
ODI 12.2 introduced the use of Subversion as an integrated VCS tool within ODI Studio. This was a significant step forward, however many IT organisations have adopted GIT as the VCS of choice. The latest patch-set release of ODI 12.2 addresses this and gives us the ability to GIT as a VCS platform alongside ODI as a data integration tool
Over the past few months I have taken an early look at the newly released GIT functionality. One point to note is that versioning process used in ODI GIT integration is COMMIT & PUSH, this may not be the norm for developers used to committing their changes as they work and doing a single push as milestone in the development process. Thought will need to be given concerning the most appropriate way to manage when and how to branch the master tree in the GIT system; developing in Master may not be the best choice.
When I use GIT I am often using github.com as a cloud hosted GIT platform. For security I use 2 factor authentication (2FA) on my desktop client and for web access. If you have to use 2FA to access your GIT system from ODI you need to generate an application token to use instead of your GIT password in ODI. If you are using GITHUB.COM the token generator needs to know what level of access to GIT you need, and for ODI this will be a level that allows you to push and commit. One watch point is that the generated token (a long hexadecimal string) is only visible at the time time of creation, if you forget the string you need to create a new one — you should, of course, revoke the old one to reduce the risk of unused tokens being at large.
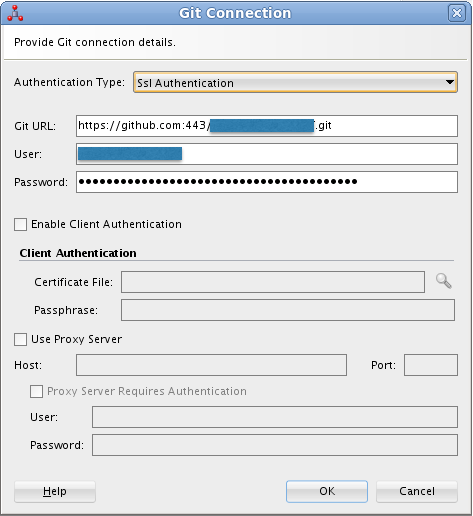
Setting up GIT access in ODI is done through the team menu. First use ‘Switch Versioning Application’ to select GIT versioning, next enter the ‘Settings’ sub-menus in order from the top (shown below).

First edit the connection. For GITHUB.COM you must use SSL Authentication to write to the remote repository — the other options are just not going to work for you and will error either straight away or, for non-encrypted protocols, at the stage you try to create your local clone repository.

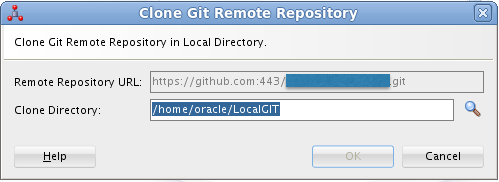
Clicking OK will invite you to confirm the SSL certificate. Next we create a local clone of the GIT repository — the remote GIT URL is already populated, we just need to give the local repository location, it will be created if necessary.

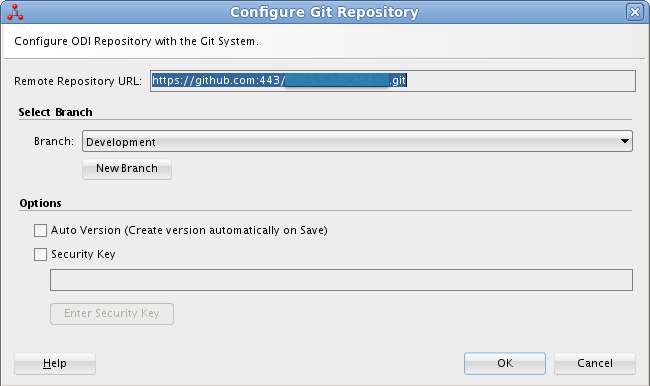
The last part is to select an existing branch to work with. The branch selector will list all of the branches currently in the remote GIT repository. The New Branch button will create an new Branch based on an existing branch. I will mention this in more detail in a following blog post.

One final point — avoid selecting the Auto Version option checkbox. Selecting this feature will commit and push a new version each time you hit save in the ODI repository, almost certainly not a good choice to make.
Next time I will blog on adding objects to ODI version control and the workflow steps you follow in managing source control and creating deployment archives. To do that I will need to talk about how ODI versioning sets up its file systems.