
How to Dynamically Set a Snowflake Virtual Warehouse
Congratulations! You just configured Oracle Business Intelligence Enterprise Edition (OBIEE) to connect to your freshly loaded Snowflake Data Warehouse instance and you’re feeling pretty good. Maybe your OBIEE dashboards are finally meeting SLAs, you’re not sitting with a DBA trying to tune SQL statements, your data is finally all in one spot, or maybe you’re just really looking forward to driving out into a field and going all Office Space on that database hardware you won’t be needing any longer. All of these circumstances call for a celebration.
OBIEE has been around for a long time and has a proven track record of being a heavy-hitting enterprise reporting platform complete with functionality such as interactive dashboards, standard and ad-hoc reporting, scheduled delivery, a robust semantic layer, identity and content management, and so on. More recently, Oracle Data Visualization has brought about another layer of reporting that encourages self-service by providing user-friendly drag and drop capabilities and modern visualizations.
Snowflake is quite a bit newer to the scene and, with growth shaped like a hockey stick and no signs of slowing down, challenges the status quo of data warehousing in several ways. One major differentiator in Snowflake’s design is the complete separation of compute from storage, referred to as a shared data, multi-cluster architecture. By using centralized storage and allowing multiple compute resources (called “warehouses” in Snowflake) to interact with the data, administrators can achieve fine-grain control over workloads and manage concurrency more effectively than in the past.
Practical Application
Hypothetically, for example, let’s say there are two users accessing the same Snowflake database. One user is a finance analyst interested in aggregating finance data; and the other: a data scientist performing statistical analysis. The finance analyst’s workloads are typically lighter and take a few seconds to complete. On the other hand, the data scientist is writing complex queries that use analytical functions; these queries return in minutes rather than seconds. In this scenario, I don’t want to ratchet up the compute power I’m giving to the finance analyst as there is no reason to. I do, however, want to give the data scientist some more compute resources to work with. Snowflake’s shared data, multi-cluster architecture allows me to do just that.
When running queries manually or programmatically using one of the Snowflake connectors, the USE WAREHOUSE command can be issued prior to running the workload. How can this be done in OBIEE? Glad you asked! OBIEE tracks the user assigned to a particular session and after some configuration, can dynamically assign the appropriate Snowflake warehouse.
Snowflake Setup
All of the setup that follows will be configured using object names specific to Red Pill Analytics. Simply change the object names to match your instance if you’re following along.
To begin, two different size warehouses are needed in Snowflake, one for the finance analyst and one for the data scientist. These scripts will create an x-small and a medium warehouse in a suspended state and accept the defaults for other settings:
create warehouse if not exists analyst_wh with warehouse_size =’xsmall’ initially_suspended = true;
create warehouse if not exists scientist_wh with warehouse_size =’medium’ initially_suspended = true;
Configure OBIEE Application Roles
When running queries against a data source, OBIEE will use the first valid connection pool in the physical layer of the RPD that a user has access to. Consequently, we can control which connection pool OBIEE uses for each session by selectively granting access for application roles.
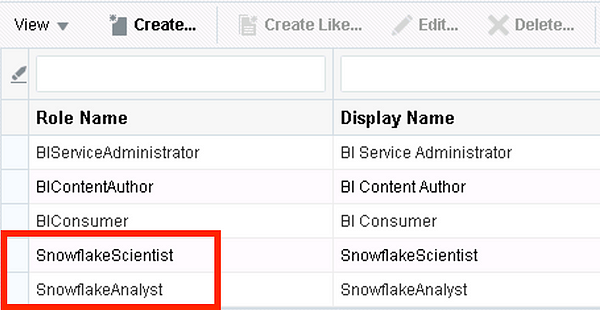
For testing purposes, I have created two new application roles in the weblogic domain with the names SnowflakeAnalyst and SnowflakeScientist and assigned two users, analyst and scientist, respectively:
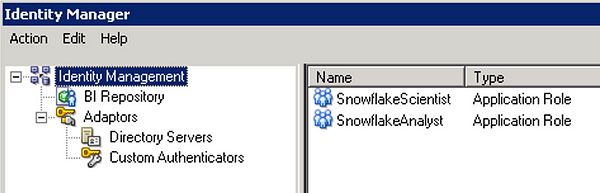
I then created the matching roles in the RPD under Identity Manager:
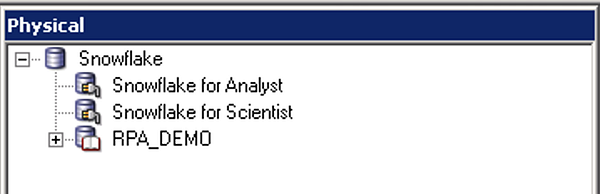
Now dedicated connection pools must be created for each role or groups of roles that we want to use particular Snowflake warehouses:
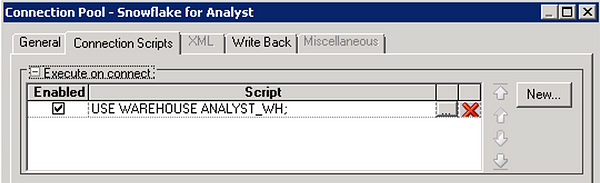
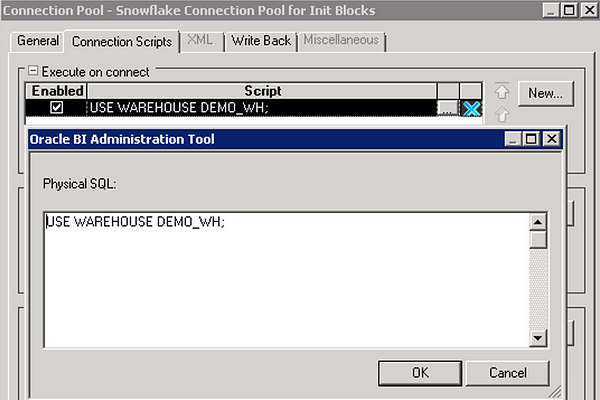
In each connection pool, navigate to the Connection Scripts tab and set the corresponding Snowflake warehouse name by creating a new script under Execute on connect:
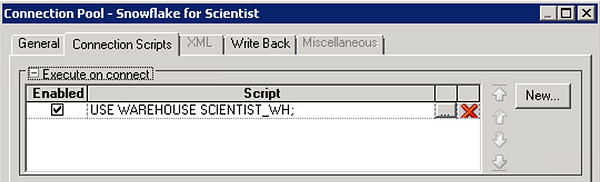
Note: If the option to ‘Require fully qualified table names’ is not checked in the connection pool or the SQL issued by an initialization block does not use fully qualified object names, a namespace (database or schema) will need to be set with a connection script similar to the script that sets the warehouse.
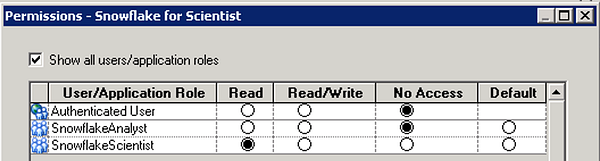
In the permissions dialogue box within the Snowflake for Analyst connection pool, only grant access to the SnowflakeAnalyst role and remove access for all others.
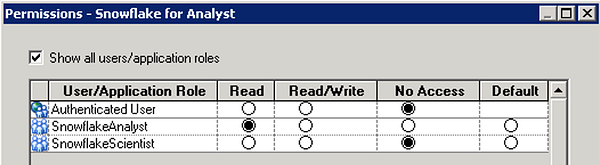
Set the permissions on the Snowflake for Scientist connection pool in a similar fashion, granting access only to the SnowflakeScientist role.
Validation
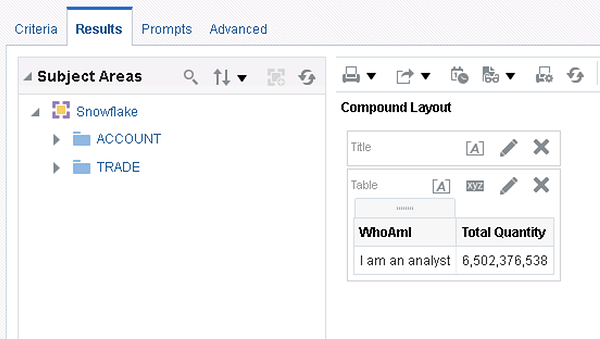
After logging in as analyst and running a simple report against some brokerage data, we can see that the ANALYST_WH warehouse was used by checking Snowflake history:

This is encouraging but the last test will be to see what happens when the scientist user logs in:

In this case, the SCIENTIST_WH warehouse was used which means the test is successful. At this point we can continue to create the necessary roles and corresponding connection pools for additional users.
Another Option
Creating roles and dedicated connection pools works well if the number of virtual warehouses in Snowflake is relatively small but how can we scale and be more accepting of change? By using OBIEE variables and a custom control table in Snowflake, we can achieve the same functionality without having to continuously make metadata updates or worry about the number of connection pools becoming a maintenance nightmare.
Configuring Snowflake
A few more short configuration tasks are required in Snowflake. Using the same warehouses from the previous example, the next step is to create a control table that OBIEE will reference when determining which Snowflake warehouse to assign:
create table if not exists rpa_demo.public.obiee_warehouse_ctl(
 role_name varchar(20),
 snowflake_wh varchar(20)
);
The last step in Snowflake is to populate the control table with role names and assign a warehouse for each user:
insert into rpa_demo.public.obiee_warehouse_ctl values('SnowflakeAnalyst', 'ANALYST_WH');
insert into rpa_demo.public.obiee_warehouse_ctl values('SnowflakeScientist', 'SCIENTIST_WH');
Configuring OBIEE
At this point, we can head back over to OBIEE. I’ll operate on the assumption that the base Snowflake connection pool has already been created. With that in mind, a new Snowflake connection pool to be used by initialization blocks needs to be set up.
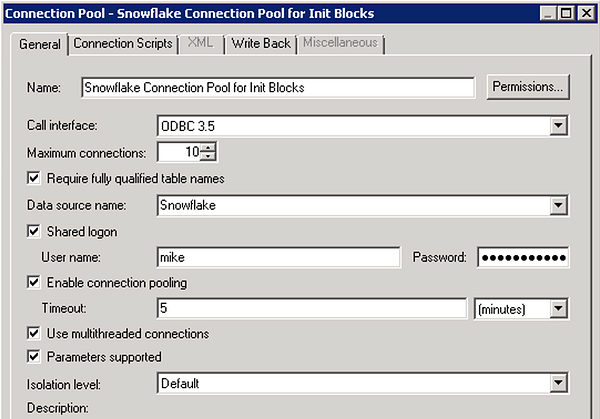
On the Connection Scripts tab, set the warehouse by creating a script under Execute on connect. In this case, I’m using the DEMO_WH warehouse that comes out-of-the-box with Snowflake.
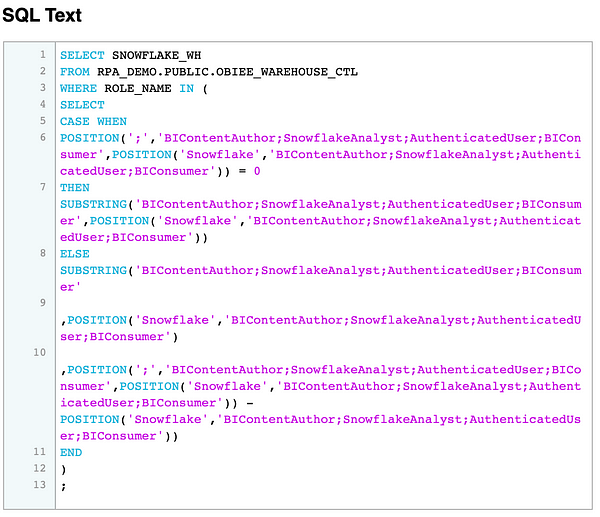
Now create a new initialization block under Manage > Variables using the connection pool created above. Enter the following ugly looking SQL statement in the Initialization Block Data Source:
SELECT SNOWFLAKE_WH
FROM RPA_DEMO.PUBLIC.OBIEE_WAREHOUSE_CTL
WHERE ROLE_NAME IN (
SELECT
CASE WHEN
POSITION(';','VALUEOF(NQ_SESSION.ROLES)',POSITION('Snowflake','VALUEOF(NQ_SESSION.ROLES)')) = 0
THEN SUBSTRING('VALUEOF(NQ_SESSION.ROLES)',POSITION('Snowflake','VALUEOF(NQ_SESSION.ROLES)'))
ELSE SUBSTRING('VALUEOF(NQ_SESSION.ROLES)'
                 ,POSITION('Snowflake','VALUEOF(NQ_SESSION.ROLES)')
                 ,POSITION(';','VALUEOF(NQ_SESSION.ROLES)',POSITION('Snowflake','VALUEOF(NQ_SESSION.ROLES)')) - POSITION('Snowflake','VALUEOF(NQ_SESSION.ROLES)'))
END
)
;
NQ_SESSION.ROLES is a session variable that returns a semicolon delimited string of roles assigned to the user. The SQL statement above searches the string for the first occurrence of Snowflake and returns the name of the role. It goes without saying that it is important to follow a consistent naming standard when creating application roles to allow the initialization block to work.
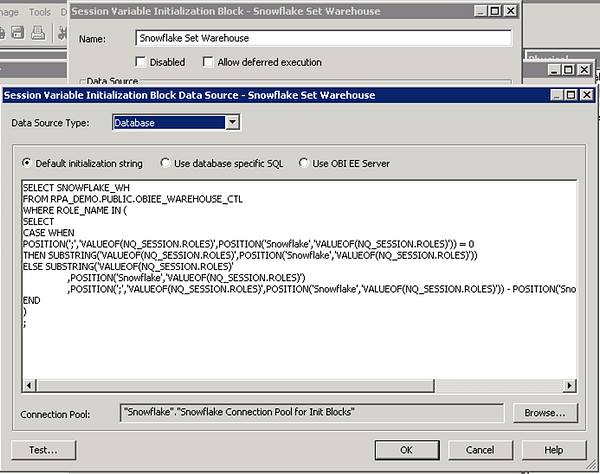
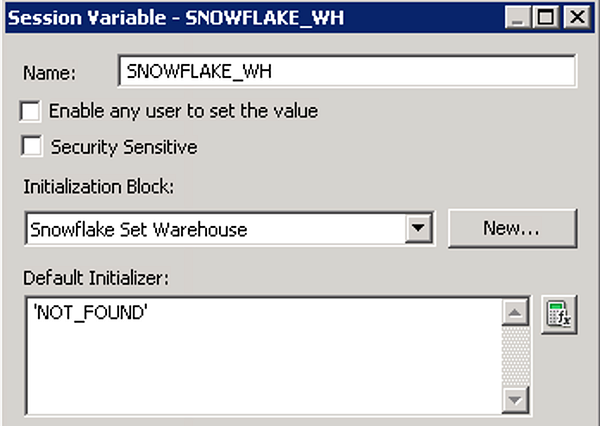
Set up a new SNOWFLAKE_WH variable that uses the Initialization Block Snowflake Set Warehouse with the properties shown below.
In the base Snowflake connection pool used for querying, navigate to the Connection Scripts tab and create a new connection script under Execute on connect:
USE WAREHOUSE VALUEOF(NQ_SESSION.SNOWFLAKE_WH);

Testing
Using the same users and roles from above, let’s take a look at what happens in Snowflake when analyst logs in:

The script to set the warehouse in the connection pool for init blocks was run first and then the SQL statement from the initialization block to set the SNOWFLAKE_WH fired off with the NQ_SESSION.ROLESvariable resolved to the list of roles assigned to analyst. So far so good. The next item of interest is to test a simple ad-hoc analysis and check that the correct warehouse is used:

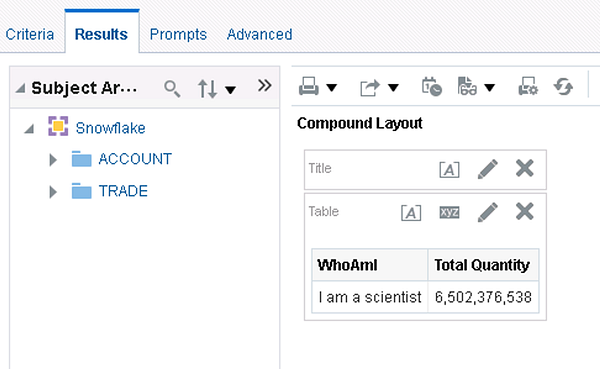
Note the warehouse that was used to run the query was the x-small ANALYST_WH. Again, it seems to be working but just to be sure, let’s log in as scientist and check the results:

This time OBIEE used the medium SCIENTIST_WH to run the report query which is exactly what was expected. The solution is working as designed and now this setup can be extended to accommodate several users and warehouses of various sizes.
Final Thoughts
Both solutions will produce the same result. The size of the OBIEE implementation, the number of virtual warehouses in Snowflake, and the rate of change that occurs within each will help drive which solution to choose. Another topic to consider is the skillset of the developers or administrators that will manage the connections; it may be easier for some folks to maintain the metadata repository while others prefer to work in Snowflake.
Getting back to the idea of practical application, performance is not the only reason to assign warehouses to specific users. For example, some organizations use a chargeback model so that each operating unit pays for compute processing based on usage. Assigning separate warehouses to different internal OUs is one way help facilitate a chargeback model. On a different but somewhat related note: for information on how to manage sharing data with external users, I highly recommend checking out Sharing Data in Snowflake.
Need help?
Red Pill Analytics is a Snowflake Solutions Partner as well as an Oracle Partner with many years of experience with Snowflake, OBIEE and other Oracle products. From proof-of-concept to implementation to training your users, we can help. If you are interested in guidance while working with Snowflake, OBIEE, OAC, or any of your data or analytics projects, feel free to reach out to us any time on our website or find us on Twitter, Facebook, and LinkedIn.
fin