
Data Monitoring: using dbt and SnowFlake’s time-travel to track your KPIs
Analysts, Data Engineers and all data crew are always eager to offer the best set of analytical tools, qualified data, a good performance and agility when delivering data products to the user areas. And when it comes to KPI’s, the interest is a bit higher, because if you’re not tracking your indicators correctly, you may not be able to take corrective actions. After all, no one is willing to look at Revenue Results on a month-end day and be surprised by a poor sales result and goals that won’t be achieved.
Let’s give a face to it. Say your company has a Sales Goal clearly defined: Increase Monthly Sales Revenue by 10% (compared to previous month)
The common way of tracking KPIs like this is by monitoring/analyzing Month-to-date results until the month is done. But what else can be happening behind the curtains that could be impacting sales results and is not being shown in a MTD summary result?
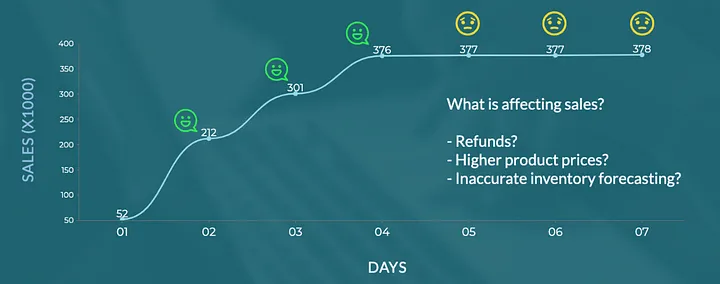
If the causes for a bad sales result are somehow predictable, you can have dbt monitoring and alerting in case these supporting structures are not evolving as expected. I.e.:
- Refund is increasing
- Price or cost is increasing
- Inventory issues leading to out-of-stock products
To get this done, we’ll need:
- To know the data in details. Understand the patterns, gaps, how results evolves across the days and weeks and what you can be sure to expect of the data. This way you’ll be able to set reliable dbt tests and mitigate false-positive results.
- Implement a dbt test logic that summarizes a column and compares to an older version of the same column (that’s where we’ll use snowflake’s time-travel)
- Set-up the tests in YML files for the columns we want to test/track
- Create dbt jobs, schedules and set-up alerts
In this post, we’ll be focusing on topics 2 and 3.
Quick overview on dbt tests
Dbt offers a few native good options of performing tests (singular, generic and custom generic tests). But if that’s not enough, here’s a couple of external packages that really helps to get things done faster and painlessly:
- dbt-utils generic tests (https://hub.getdbt.com/dbt-labs/dbt_utils/latest/)
- dbt-expectations (https://github.com/calogica/dbt-expectations)
Putting all together: dbt test + time-travel
Note: this tutorial assumes you have time-travel feature enabled and already set-up. If you don’t want to use time-travel, other options are to build summary tables, snapshot your data or even use the metrics layer in dbt.
Why using time-travel and dbt generic tests?
If you are a consultant, an analyst, analytics engineer or another member of a data team, you want to deliver your products to the user areas as quick as possible. Other methods would require you to build new fact summarized tables, or even to start gathering data if the requirements are not completely satisfied. The time-travel feature enables you to look back to older versions of the table just as they were at the time.
Combining the use of snowflake’s time-travel and dbt macros/automated tests, every time you want to track a new indicator/kpi, all you need is to update your yml. All code is re-usable. You can even empower end users to do so, why not?
We’ll compare the most recent result of a column to an older version of it. So we need a dbt macro to place our test logic:
-- file name: macros/kpi_monitor.sql

{% test kpi_monitor(model, column_name, direction, min_threshold, max_threshold, agg_type, strictly, days_to_lag, working_days_only) %}

    {%   if strictly|lower == 'true'  and direction|lower == 'increasing' %}{% set op = '>'  %}
    {% elif strictly|lower == 'false' and direction|lower == 'increasing' %}{% set op = '>=' %}
    {% elif strictly|lower == 'true'  and direction|lower == 'decreasing' %}{% set op = '<'  %}
    {% elif strictly|lower == 'false' and direction|lower == 'decreasing' %}{% set op = '<=' %}
    {% endif %}


{% if working_days_only == true %}

with date_to_lag as (

    select date_col from (
    select row_number() over (order by null) as rn, date_col from (select
                          dateadd(day, '-' || row_number() over (order by null), dateadd(day, '+1', current_date())) as date_col,
                          case when dayofweek(date_col) in (1,2,3,4,5) then true else false end working_day
                          from table (generator(rowcount => 120))
                          qualify working_day = true)
    qualify rn = {{ days_to_lag }}+1)

)

{% else %}

with date_to_lag as (

    select current_date-{{ days_to_lag }}

)

{% endif %}

    select * from (
        select
            {{ model }} as table_name,
            {{ column_name }} as column_name,
            (select * from date_to_lag) as compare_to_date,
            (select {{ agg_type }}({{ column_name }}) from {{ model }} at(timestamp => date_to_lag::timestamp_tz)) as previous_value,
            (select {{ agg_type }}({{ column_name }}) from {{ model }}) as current_value,
            ((current_value-previous_value)/previous_value)*100 as pct_change,
            case current_value {{ op }} previous_value and abs(pct_change) between {{ min_threshold }} and {{ max_threshold }} when true then 'pass' else 'fail' end as result
    )
    where result = 'fail'

{% endtest %}
In case of failure, meaning the test failed, dbt test would return more than 0 rows. In this case, the SQL output should look like this:

Now we need to set-up the test using a yml file. Here’s 2 examples:
version: 2

models:
  - name: sales_fct
    columns:
      - name: sales_revenue_amount
        tests:
          - kpi_monitor:
              direction: increasing
              min_threshold: 1
              max_threshold: 5
              agg_type: sum
              strictly: false
              days_to_lag: 1
              working_days_only: true
  - name: refund_fct
    columns:
      - name: refunded_amount
        tests:
          - kpi_monitor:
              direction: decreasing
              min_threshold: 0
              max_threshold: 1000
              agg_type: sum
              strictly: true
              days_to_lag: 1
              working_days_only: true
A quick walk-through the parameters:
Direction
increasing or decreasing.
Examples:
- Increasing (Revenue, Sales, New Customers..)
- Decreasing (Costs, Churn Rate, Refunds, Rate of Return..)
Minimum Threshold and Maximum Threshold
We can make a good use of thresholds and raise a failure in case measures are too high, indicating some inconsistencies in the process. Or if not increasing as expected.
Examples:
- Weekly NET_SALES: increasing should be higher than 10%
- Daily TOTAL_NET_USD: increasing can’t be higher than 8%. If your historical data says more than 8% DoD measure increasing is unlikely, it would be better to receive alerts 😉
Aggregation Type
Accepts Sum, AVG and Count. Also accepts Max and Min if you can make sense of using it 🙂
Strictly
If measures not increasing or decreasing isn’t necessarily a bad thing, you can set STRICTLY parameter to “False”. This adds the “equal ( = )” sign to the operator (< or >).
Note: set min_threshold to 0 if using strictly: false
Days To Lag
Here’s where we can take benefit of Snowflake’s Time-travel. This parameter sets the number of days we are looking into the past.
Note 1: Consider understanding how Snowflake’s Time-travel works and retention periods (https://docs.snowflake.com/en/user-guide/data-time-travel)
Note 2: dbt’s default table materialization drops the table every run. This way, the time-travel ability is lost. Consider changing to a truncate-insert custom materialization.
Working Days Only
You can skip weekends from the equation by checking working_days_only to false.
Note: Consider changing the macro and adding a custom calendar to remove national and local holidays either.
Now that you’re all set up, simply schedule your dbt data monitoring tests and start receiving alerts in case of inconsistencies/changes in the data and kpis.
Alerts can be set natively via dbt, including slack integrations and e-mail notifications (https://docs.getdbt.com/docs/deploy/job-notifications). Or, if you need a more flexible and customized solution you can use Amazon lambdas and SNS notification system. Reach out if you have questions on that.
Along with the native dbt tests and third party packages, you’re fully equipped to keep track of all types of changes in your data putting you in a position to make predictive and strategic decisions.
3 Responses to Data Monitoring: using dbt and SnowFlake’s time-travel to track your KPIs