
That title sounds a little weird, tunnels go through the ground and clouds are those fluffy things that float in the sky. However when we are talking about Oracle Cloud and SSH tunneling things make a lot more sense. Although this blog is specific to the Oracle Cloud Database, tunneling is a generic technique and will work with other cloud providers and your own on-premises systems.
Before the how, a little of the why.
Cloud resources are plugged into the internet — that is, our connection to the cloud database is going to be to the public IP address of the compute node of the database. Exposing the DB listener to the whole internet is probably a bad idea; even with strong passwords in the database, an exposed listener is a sort of ‘have a go at hacking me’ flag. To minimise such risks the Oracle Cloud Compute Node security rules default to no-access for the public internet to the listener. If our client has a known public IP address we could set up a rule to allow just that IP address to access the listener, however this is probably not sustainable in the long term. Many Internet Service Providers (ISP) present multiple pools of addresses and this hopping about of a user’s IP address can cause a lot of problems with the need to edit rules to accommodate changing IP addresses or leave over generous masks in place to allow blocks of addresses to pass. Add to this the reluctance of some corporate networks to allow outbound SQLNet traffic to pass through their routers and we see that it probably best not to access the Cloud database listener over the internet.
If only there was a way to provide a secure, encrypted connection over the internet to the database that does not use the listener. There is! Step up tunneling. Here we create a secure SSH connection to the Oracle Cloud Compute Node and then create a port redirect on our local computer so that any traffic to that port is translated to an IP address and port on the remote network.
Setting it up
Before we create an Oracle Cloud Database we have to generate a public / private key pair and to upload the public key to be used as part of the creation process. This ‘master’ private key is precious as it allows you to create as SSH connection to the the DB and perform highly privileged operations in the underlying operating system.
Obviously, we DO NOT WANT TO USE THIS KEY for our secure tunnel to the database listener, instead we should create a new private / public key pair and a new Linux user specifically for port forwarding. In my examples I am using tunnel_user as the Linux user and cloud_host as the address of the Oracle Cloud Database Public IP Address.
Oracle has posted a tutorial on Oracle Cloud Linux user creation, we can adapt that to suit our needs. The main difference is that we are not setting up a new administrator user, so we can omit the final stages of the tutorial. In outline the steps are:
- Create a new private / public key pair. My preference is to ssh-keygen on my MacBook to make a RSA 2048-bit key pair, but other tools can do this. In this blog I named the key pair tunnel_user. On my MacBook the key pair is created in my user’s .ssh directory or using conventional Nix-like syntax ~/.ssh (by the way, the tilde sign means ‘home of’: ~ = my home, ~oracle = the oracle user’s home)
- Start a ssh terminal session to the Oracle Cloud Compute Node. Using the ‘master’ private key (the one paired with the public key used to create the database) connect as the opc user.
ssh -i ~/.shh/MasterKey opc@cloud_host - Escalate privileges (sudo su)
- Create a new Linux user
useradd tunnel_user
This user will not need a password as we will only be using the ssh key to access the Cloud Compute Node. - Create a .ssh directory in the new user’s home directory
mkdir ~tunnel_user/.ssh - Copy the public key you created for this user into your paste buffer and add it to the authorized_keys file in the .ssh directory (the Oracle tutorial uses echo [my public key] > ~[tunnel user name]/.ssh/authorized_keys to do this, which might overwrite an existing file, so maybe >> is better to use than >).
- Using your prefered text editor add the new user to the AllowUsers line of /etc/sshd_config. Search for the line starting with AllowUsers and edit it for example
AllowUsers opc oracle becomes AllowUsers opc oracle tunnel_user - Change the ownership of the key file to the new user
chown -R tunnel_user:tunnel_user ~tunnel_user/.ssh - We have now finished with the Oracle Tutorial steps, so exit from root and exit from opc.
- Log in as the new user to verify that the new ssh connection works and then log out — this step is strictly not necessary but it makes debugging simpler at this time
ssh -i ~/.shh/tunnel_user tunnel_user@cloud_host
exit - Log in as opc and sudo to root.
- Modify the new user to use the /sbin/nologin shell
usermod -s /sbin/nologin tunnel_user. - Exit from root and opc then try connecting to the tunnel_user through shh.
ssh -i ~/.shh/tunnel_user tunnel_user@cloud_host
You should be politely refused.
The Linux compute node is now set for tunnelling with port forwarding but can not be used to create a Linux session.
As I mentioned earlier, port forwarding is where ALL the network traffic for a specific port is redirected down the shh tunnel to the remote server where it passed to an ip address and port visible to the remote server. The target database does not have to be on the machine we have tunnelled to, it just needs to be network accessible from the remote host
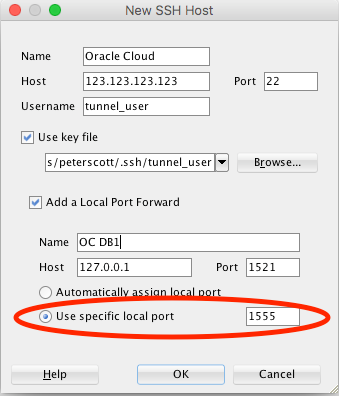
In my use case the database is running on the compute node and used the default (1521) port. My target database connection is 127.0.0.1:1521. The local port I redirect can be any unused user port. Some people use 1521 as the local port, but that is only suitable if you do not need to connect to any Oracle databases on port 1521 on your local network. Remember too, that if you tunnel to multiple destinations each tunnel will need its own local port number.
Creating the tunnel is relatively simple. If you are using Oracle SQL Developer 4.1 (or later) we can even do that in the GUI. As long as the connection is open in SQL Developer the tunnel is also available to any of your applications that wish to connect to the database — this includes R Studio, SQLDesktopJ, the OBIEE Admin tool and ODI Studio, in fact any way we can connect to the database using an IP address and port number. As I often need to use SQL Developer for looking at the database this is very convenient for me. You can find simple instructions to set this up here. I would make a couple of changes to that method. Firstly, do not use your database create key (MasterKey in my example above), instead use the one created specifically for the tunnel_user. The second change is that we should manually specify the port number we want to use in the redirect; leaving it set as automatically assigned is fine if we are only going to use SQL Developer, however we do need to know the local port number if we are going to use the tunnel to connect to the database from other local clients.
If you want something a little more light-weight we can use a terminal session to host the tunnel — PuTTY works well if you are into Windows, but as an Apple-fan-boy I would use Apple Terminal.
In PuTTY we create a new session to connect to the Oracle Cloud compute node and then add our authentication details on the SSH-Authentication tab followed by the tunnel details on the SSH-Tunnel tab finally back to the session tab and save it. Open the session and leave it running. As always with PuTTY you could use a command line connection string: the syntax is very like that for ssh given below
In a terminal application on Linux or a Mac things are even easier. We just invoke SSH to use our key file and create a tunnel using a command like:
ssh -i ~/.shh/tunnel_user -L 1555:127.0.0.1:1521 tunnel_user@cloud_host -N
The -N at the end of the command is important as this tells shh not to establish a command shell connection.
Remember, the tunnel is a connection to the remote server, not to the database, we will still need to use JDBC or whatever other protocol (OCI, ODBC etc) to create a database session so we still need a valid Oracle user name and a password. The only things we change in our connection is to use the redirected local port and the address we set up in the tunnel command (in my examples this is port 1555 and IP address 127.0.0.1).
Happy tunneling folks!